
Ink & Algorithms
Stop Paying for LLM APIs - Run Them Free on Google Colab
Last month, a developer on Hacker News posted their monthly OpenAI invoice. $340. For a side project. The comment thread was full of people nodding along - not because the pricing is unfair, but because per-token billing during development genuinely hurts. You iterate fast. You test edge cases. You run the same prompt forty times trying to figure out why your output keeps breaking. The costs stack up before you ship a single feature.
Here's the thing: for most development and prototyping work, you don't need a paid API. You need a model that runs, responds fast enough to iterate, and doesn't charge you per call. That's a solved problem. Most developers just don't know it yet.
Ollama on Google Colab is the free LLM API alternative nobody talks about.
Ollama is an open-source tool that runs LLMs locally - or in this case, on Google's free cloud GPU - and exposes them through a REST API that's compatible with both the OpenAI SDK and the Anthropic SDK. That last part matters more than it sounds. You don't have to rewrite your app. You just point base_url somewhere else.
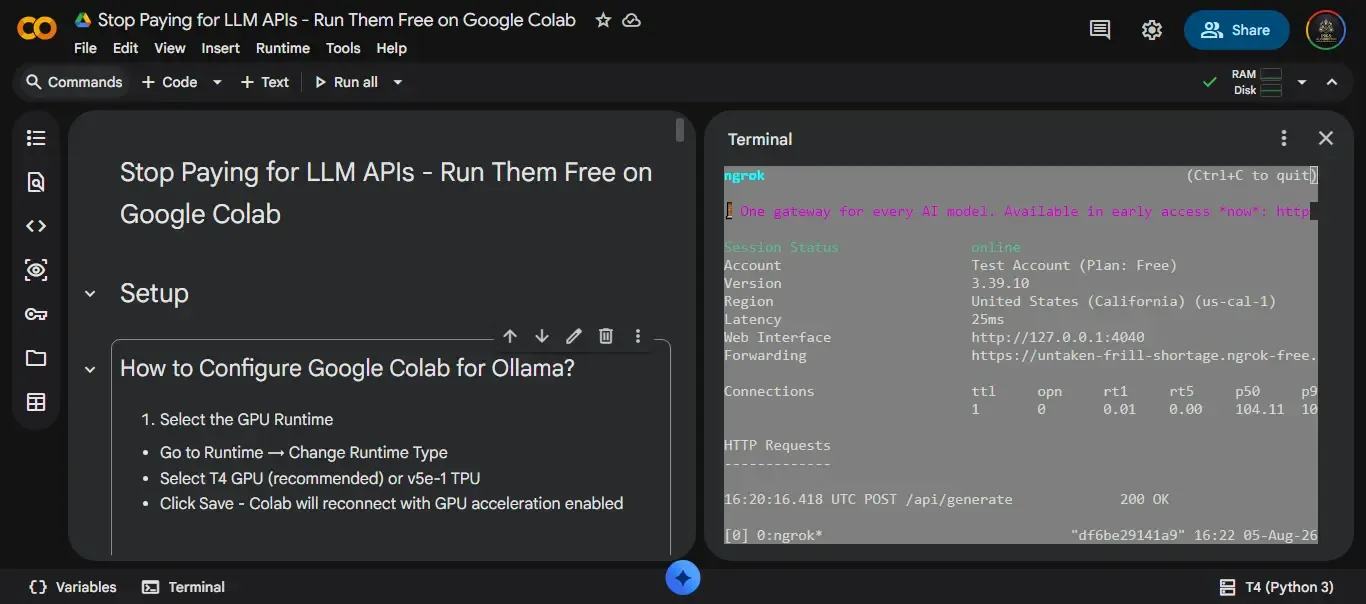
Google Colab's free tier gives you a T4 GPU with 16 GB of VRAM. That's enough to run 7B and 8B parameter models at a speed that's actually usable. Ngrok punches a secure tunnel through to that server, so you can hit it from your laptop, your CI pipeline, or Claude Code - not just from inside the Colab notebook.
By the end of this guide, you'll know how to:
Configure a Colab notebook with GPU runtime and install Ollama in under five minutes
Pick the right model for your available VRAM, with a full compatibility table
Persist your models to Google Drive so you never re-download them on session restart
Test your setup using the native Ollama SDK, the OpenAI SDK, and the Anthropic SDK - with a direct comparison of all three
Expose the server publicly via Ngrok, and lock it down so it's not just sitting open on the internet
One thing worth knowing up front: Ollama has natively supported the Anthropic Messages API endpoint since v0.14.0. That means this isn't a workaround or a wrapper - it's a first-class integration you can use with real Anthropic SDK code.
Let's get into it.
🦙 What Is Ollama and Why Run It on Google Colab?
Ollama is a free, open-source tool that lets you pull and run large language models with a single terminal command. It handles the model download, GPU detection, and API server startup automatically - no Python environment wrangling, no CUDA driver debugging, no manual quantization. You run one command, and a few minutes later you have a working LLM server.
🧩 What is Ollama?
The simplest way to think about Ollama: it's a package manager for LLMs, with a built-in inference server.
Pull a model the same way you'd pull a Docker image:
ollama pull gemma3That's it. Ollama downloads the model, stores it locally, and starts serving it through a REST API on localhost:11434. The API is OpenAI-compatible out of the box - and since v0.14.0, it also supports the Anthropic Messages API endpoint natively. That means any code written against the OpenAI or Anthropic Python SDKs works with Ollama by changing one line.
The model library covers most of what developers actually use:
Meta Llama 3 (8B, 70B) - strong general reasoning
Google Gemma 3 (4B, 8B, 27B) - fast, efficient, beginner-friendly
Mistral 7B - reliable all-rounder with good instruction following
Alibaba Qwen3 (8B, 14B) - strong multilingual and coding performance
Microsoft Phi-3 (3.8B) - surprisingly capable at low VRAM
DeepSeek-R1 (8B) - chain-of-thought reasoning built in
Over 100 models are available at ollama.com/search, most with multiple quantization levels. The :q4_0 suffix cuts VRAM usage by roughly 40% - useful when you're working with constrained hardware.
Normally, Ollama requires a local GPU. That's the catch for most developers. A decent GPU for running 8B models starts around $300–500 used, and driver setup on Linux can eat a full afternoon. That's where Colab changes things entirely.
🚀 Why Use Google Colab Instead of Running Locally?
Google Colab's free tier gives you access to an NVIDIA T4 GPU with 16 GB of VRAM. For context, that's enough to run Llama 3 8B, Gemma 3 8B, Mistral 7B, and Qwen3 8B - comfortably, with headroom to spare. You get this from a browser tab, in about 60 seconds of setup, at no cost.
There's no hardware to buy. No CUDA toolkit to install. No driver version conflicts. Colab handles all of that - the GPU is already configured when the runtime starts. For anyone who's spent time getting local GPU inference to work, that's not a small thing.
The practical case for Colab over local setup:
Zero upfront cost - free T4 GPU vs. $300–500+ for a used GPU
No CUDA configuration - runtime comes pre-configured with NVIDIA drivers
Browser-based access - works on any machine, including laptops without discrete GPUs
Fast iteration - spin up a fresh environment in under two minutes
Ideal for experimentation - test new models without committing disk space locally
For students, indie developers, and anyone building LLM-powered tools on a budget, this combination removes the last real barrier to self-hosted inference.
⚠️ Limitations to Know Before You Start
None of this is magic. There are real constraints worth knowing before you build anything on top of this setup.
Session timeouts. Free Colab sessions run for up to 12 hours of active use, then disconnect. The runtime resets completely - everything in the VM's filesystem is wiped. If you haven't configured persistent storage, you lose your downloaded models and have to pull them again.
Model re-downloads. A 7B model is typically 4–6 GB. Pulling it fresh every session adds 3–5 minutes of dead time. This guide covers how to mount Google Drive and redirect Ollama's model storage path, which eliminates the problem entirely.
Ngrok URL rotation. The free Ngrok tier generates a new public URL each time you restart the tunnel. Anything that hardcodes the URL - a frontend app, a Claude Code config, a .env file - breaks when the session resets. Paid Ngrok plans support static domains; the free tier doesn't.
Not production-ready. Colab sessions aren't persistent, the URLs change, and there's no uptime guarantee. For production workloads, look at RunPod, Lambda Labs, or Vast.ai - GPU cloud providers where you rent dedicated compute by the hour and keep it running.
🆚 How Does It Compare to Other Options?
| Local GPU | Google Colab Free | Google Colab Pro | Paid GPU Cloud | |
|---|---|---|---|---|
| Cost | $300-$1,000+ (one-time) | Free | $10-$50/month | $0.20-$2.00/hr |
| VRAM | 8-24 GB (varies) | 16 GB (T4) | 40 GB (A100) | Up to 80 GB (A100) |
| Session Length | Unlimited | ~12 hours | ~24 hours | Unlimited |
| Setup Complexity | High (drivers, CUDA) | Low (browser only) | Low (browser only) | Medium (SSH/API) |
| Production Ready? | Yes | No | Borderline | Yes |
| Model Persistence | Yes | With Drive mount | With Drive mount | Yes |
For development and prototyping, free Colab hits the sweet spot. For anything running in production with real users, you want dedicated compute - but that's a problem you solve after you've validated the idea.
📜 Prerequisites - What You Need Before Starting
The barrier to entry here is genuinely low. No credit card. No hardware. No dev environment setup beyond what most developers already have.
Before running the first command, make sure you have the following:
✅ Google Account Required for Google Colab access and Google Drive storage. If you use Gmail, you already have this. Colab runs entirely in the browser - no installation needed.
✅ Google Drive (Free 15 GB) Used to persist Ollama model files between Colab sessions. The free 15 GB tier is enough to store two or three mid-size models simultaneously - a 7B model typically lands between 4–6 GB depending on quantization. If Drive is already close to full, clear space or consider a second Google account dedicated to ML work.
✅ Ngrok Free Account Ngrok creates a public HTTPS tunnel to your Colab-hosted Ollama server. Sign up at ngrok.com - the free tier is sufficient for development use. Keep your Auth Token handy from the dashboard; you'll need it in Step 5.
✅ Basic Python and Terminal Familiarity You don't need to be an expert. If you've run pip install and curl commands before, you're ready. Every command in this guide is copy-paste ready.
✅ No Local GPU Required This is the whole point. Colab provides the GPU. Your machine only needs a browser.
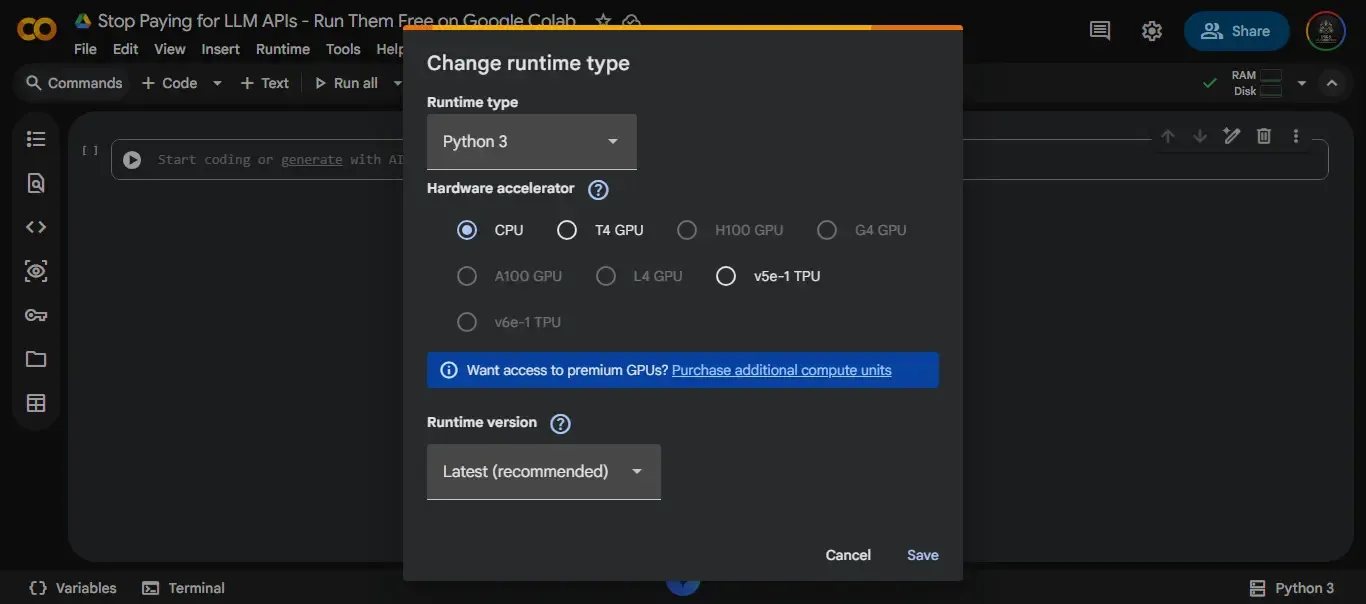
One common mistake before you start: Skipping the GPU runtime selection. Colab defaults to CPU, which makes Ollama technically functional but painfully slow for anything beyond the smallest models. Switching to T4 GPU takes ten seconds and makes an order-of-magnitude difference in response time. Don't skip it.
1️⃣ Step 1 - How to Configure Google Colab for Ollama
The single most important thing you do in this entire setup happens before you write a single line of Python. Get the runtime wrong and everything that follows will technically work - just unbearably slowly. A 7B model on CPU takes 30-90 seconds per response. On a T4 GPU, the same model responds in 1-3 seconds. That's the difference between a usable development tool and a frustrating experiment.
📓 Open Google Colab and Create a New Notebook
Navigate to colab.research.google.com and sign in with your Google account. Click New Notebook in the top-left corner. You'll land in a blank notebook with a single empty code cell - that's your starting point.
🎮 Select the GPU Runtime
This step is non-negotiable. Colab defaults to CPU, which Ollama will use silently if you don't change it.
In the top menu, click Runtime
Select Change Runtime Type
Under Hardware Accelerator, choose T4 GPU
Click Save
Colab will reconnect the runtime - this takes about 10–15 seconds. When it completes, you'll see a green checkmark and RAM/Disk indicators in the top-right corner confirming the GPU is active.
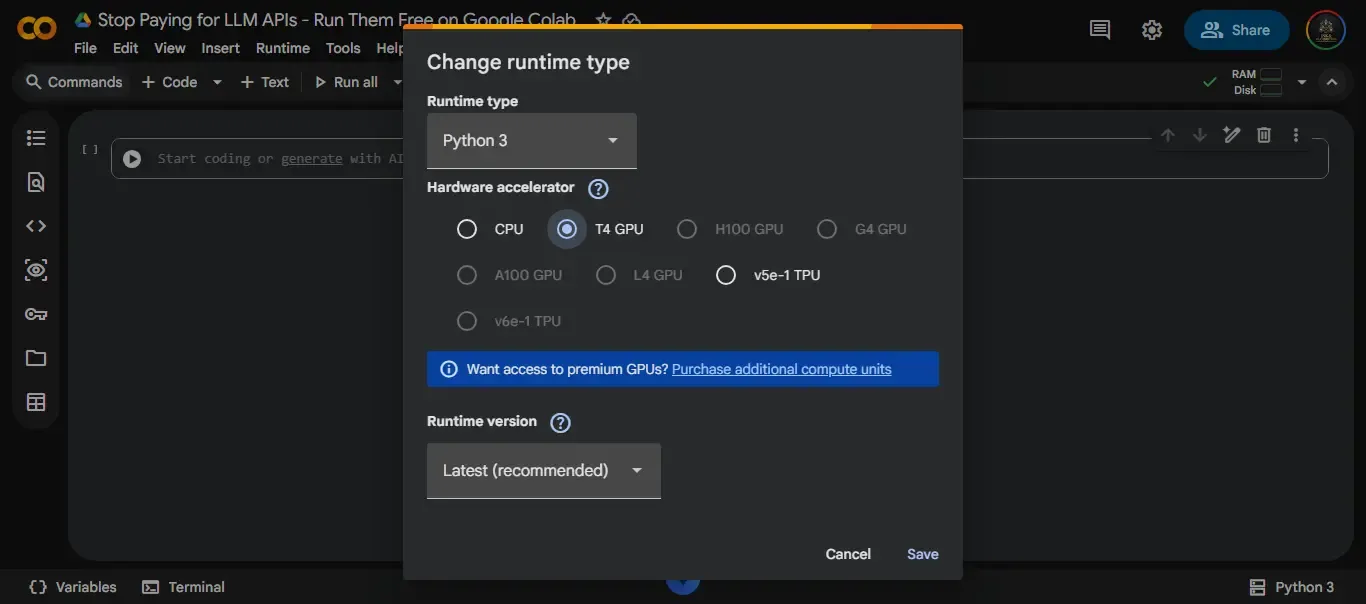
🏿 T4 GPU vs v5e-1 TPU - which should you pick?
Stick with T4 GPU. Ollama is built around CUDA and runs natively on NVIDIA GPUs. The v5e-1 TPU option is a Google Cloud TPU - a different architecture entirely, optimized for TensorFlow/JAX workloads, not general LLM inference. Ollama doesn't benefit from TPU acceleration, and compatibility is unreliable. T4 is the right call here.
Pro tip: Colab sometimes shows "GPU not available" during high-demand periods, especially on free accounts. If that happens, try switching to a different runtime type and back, or disconnect and reconnect the runtime. Peak hours (US afternoon/evening) are the worst for availability - early morning often gets you a GPU faster.
👨💻 Open the Terminal and Install Required Dependencies
Colab notebooks support two ways to run shell commands: the built-in terminal (accessible via the left sidebar terminal icon) or the ! prefix directly in a code cell. Either works. For this setup, code cells with ! are easier to re-run if something goes wrong.
In your first code cell, run:
cd ~sudo apt-get updatesudo apt-get install -y zstd lshwWhat these packages do:
| Package | Purpose |
|---|---|
| zstd | Fast compression library — used by Ollama's model download and storage pipeline |
| lshw | Hardware inventory tool — lets Ollama detect and verify GPU presence before starting |
Neither package is large. The install typically completes in under 30 seconds on a fresh Colab runtime. If apt-get update hangs for more than two minutes, disconnect and reconnect the runtime - it's a known Colab networking quirk that clears itself on reconnect.
One thing to watch for: If the cell output shows WARNING: apt does not have a stable CLI interface - ignore it. That's a standard Colab warning, not an error. Your packages installed correctly if the final line reads 0 upgraded, N newly installed.
With the runtime configured and dependencies in place, the environment is ready to receive Ollama.
2️⃣ Step 2 - How to Install Ollama on Google Colab
Ollama installs in one command. There's no build process, no dependency resolution, no virtual environment to activate. The official install script handles everything - binary download, CUDA detection, service startup - and it's done in under 90 seconds on a fresh Colab runtime.
📥 Download and Install Ollama
In a new code cell, run:
curl -fsSL https://ollama.com/install.sh | shWhat happens when you run this:
The script fetches the latest Ollama binary for your platform (Linux x86_64 on Colab)
It detects the available GPU - in this case, the NVIDIA T4 via Colab's pre-installed CUDA drivers
It installs Ollama to /usr/local/bin/ollama
It starts the Ollama server as a background process on port 11434
You'll see output like Ollama is running on http://localhost:11434 when it completes. That means the API server is live and ready to accept requests.
No manual CUDA configuration needed. Colab pre-installs NVIDIA drivers and the CUDA toolkit for any GPU runtime - Ollama picks them up automatically through the install script. This is one of the genuine advantages of running on Colab vs. a raw Linux server, where CUDA setup alone can take an hour.
🌐 Verify Ollama Is Running
Before pulling any models, confirm the server is actually listening on the right port:
sudo ss -tulnIn the output, look for this line:
tcp LISTEN 0 4096 0.0.0.0:11434 0.0.0.0:*That confirms Ollama is bound to all interfaces on port 11434 and ready to receive API calls.
You can also do a quick sanity check with curl:
curl http://localhost:11434Expected response: Ollama is running
If you get Connection refused instead, the server didn't start cleanly. The most common cause on Colab is a cold-start race condition - the script finishes but the process hasn't fully initialized.
Fix: run the below command.
nohup ollama serve > ollama.log 2>&1 &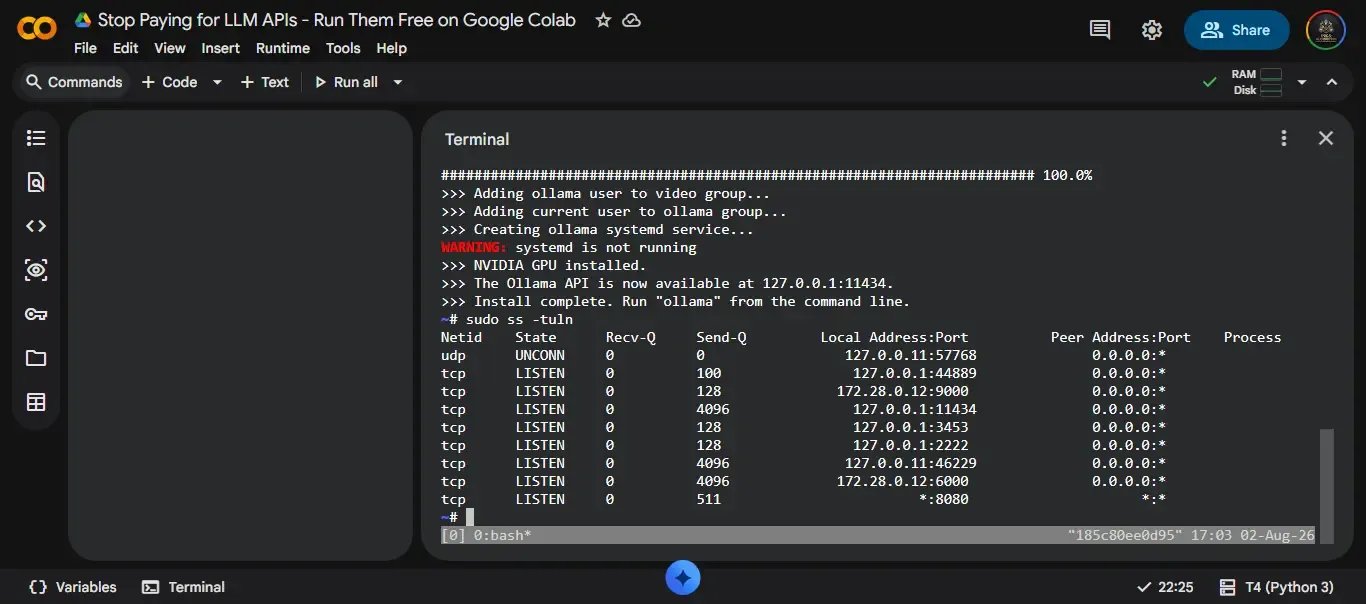
🐍 Verify Python and pip are Available
Colab ships with Python 3 pre-installed, but it's worth a quick check before installing SDK packages in the next steps:
python --versionpip --versionExpected output is Python 3.10.x or higher and pip 23.x or higher. If either command returns an error (unlikely on Colab, but possible after a runtime reset), use python3 and pip3 explicitly in all subsequent commands.
What you have at this point: A running Ollama inference server on a free T4 GPU, accessible via REST API at localhost:11434, with full OpenAI and Anthropic SDK compatibility waiting to be used. The next step is choosing and pulling the right model - and that decision depends on how much of the T4's 16 GB VRAM you want to use.
3️⃣ Step 3 - How to Choose and Pull the Right LLM Model
Choosing the wrong model size is the most common reason Ollama crashes on Colab. Not a misconfigured port, not a broken install - just a model that asks for more VRAM than the T4 has available. An out-of-memory crash mid-inference kills the server process silently, and it's not obvious what went wrong if you don't know to check VRAM limits first.
The T4 has 16 GB of VRAM. That's your hard ceiling. Pick a model that fits under it - with some headroom - and everything runs smoothly.
🗂️ Browse Available Models
Ollama's full model library is at ollama.com/search. Over 100 models are available, filterable by task category: general chat, code generation, reasoning, vision, multilingual, and embedding. Most popular models offer multiple size variants - a 3b, 8b, and 27b version of the same architecture, for example - so you can match capability to hardware.
For Colab's free T4, focus on the 4B–8B parameter range. That's where the performance-to-VRAM ratio is strongest - capable enough for real development work, well within the 16 GB limit.
⚡ Model VRAM Compatibility Table for Colab T4
| Model | Parameters | VRAM Required |
T4 Compatible? | Best For | Pull Command |
|---|---|---|---|---|---|
| phi3 | 3.8B | ~3 GB | ✅ Yes | Fast responses, low-resource tasks | ollama pull phi3 |
| gemma3:4b | 4B | ~4 GB | ✅ Yes | General chat, beginner-friendly | ollama pull gemma3:4b |
| mistral | 7B | ~5 GB | ✅ Yes | Balanced performance, instruction following | ollama pull mistral |
| llama3:8b | 8B | ~6 GB | ✅ Yes | Strong general reasoning | ollama pull llama3 |
| qwen3:8b | 8B | ~6 GB | ✅ Yes | Multilingual, coding tasks | ollama pull qwen3:8b |
| deepseek-r1:8b | 8B | ~7 GB | ✅ Yes | Chain-of-thought reasoning | ollama pull deepseek-r1:8b |
| gemma3:27b | 27B | ~18 GB | ⚠️ Colab Pro only | Advanced tasks, higher quality output | ollama pull gemma3:27b |
| llama3:70b | 70B | ~40+ GB | ❌ No | Requires A100 or dedicated GPU cloud | ollama pull llama3:70b |
Not sure which to start with? Pull gemma3 (the default 4B variant). It's fast, capable, and uses just 4 GB of VRAM - leaving the rest available as buffer. Once the setup is verified end-to-end, swap in a larger model if you need it.
✂️ Cut VRAM Usage by 40% with Quantization
Every model in Ollama's library is available in multiple quantization levels. The default pull fetches a Q4 or Q4_K_M quantized version automatically - but you can be explicit:
# Full precision (more VRAM, higher quality)
ollama pull llama3:8b

# 4-bit quantized (40% less VRAM, minimal quality loss for most tasks)
ollama pull llama3:8b-instruct-q4_0
For development and prototyping, Q4 quantization is almost always the right call. The quality difference is negligible for most tasks, and the VRAM savings let you run a larger model than you otherwise could. deepseek-r1:8b, for example, sits at ~7 GB in its default quantization - a :q4_0 variant brings that to ~4.5 GB.
📥 Pull Your Chosen Model
Once you've picked a model, pull it:
ollama pull gemma3The download takes 2–5 minutes depending on model size and Colab's network throughput. You'll see a progress bar with download speed and estimated time remaining.
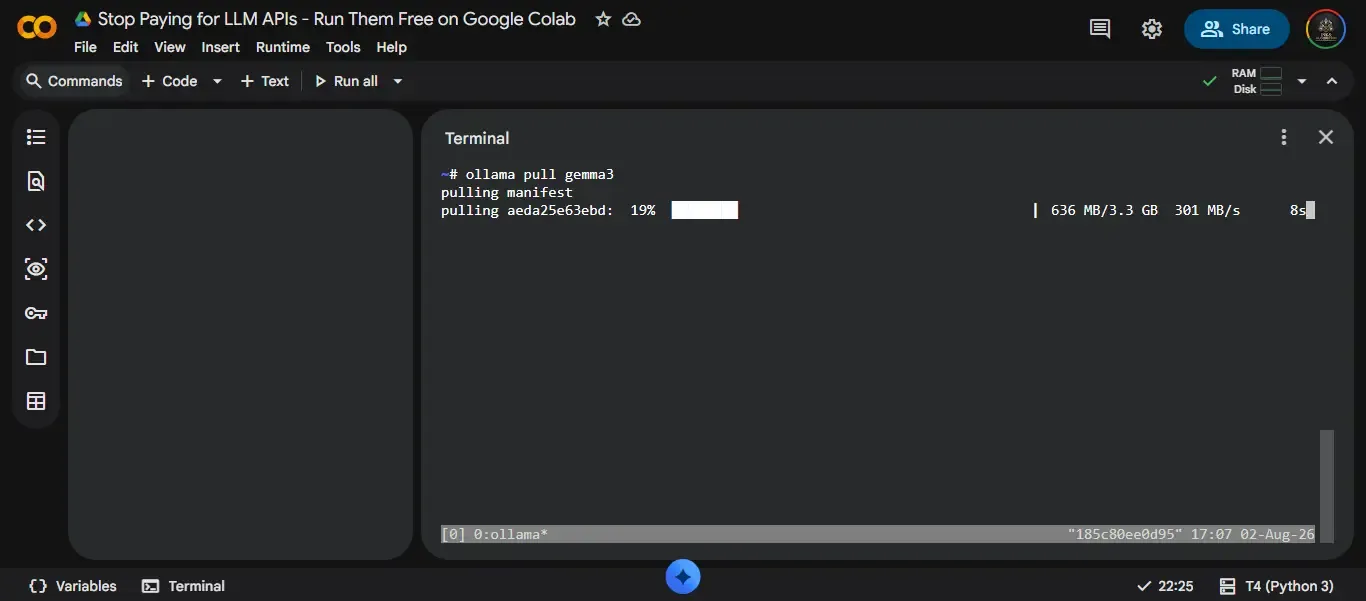
By default, Ollama stores models at /root/.ollama/models. That path lives inside Colab's ephemeral VM filesystem - meaning it gets wiped when the session ends. The next section covers how to redirect model storage to Google Drive so you only ever pull a model once.
After the pull completes, verify the model is available:
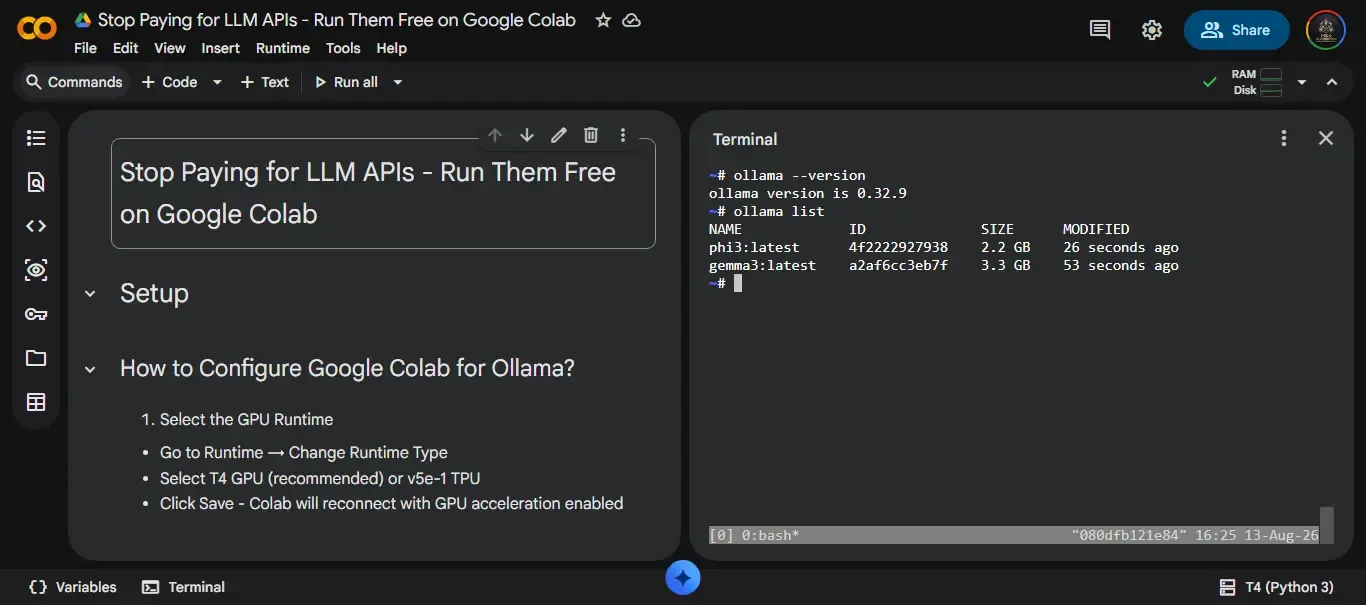
ollama listExpected output shows the model name, size, and last modified timestamp:
  NAME            ID              SIZE    MODIFIED
gemma3:latest   abc123def456    4.7 GB  2 seconds ago
If the list is empty after pulling, the download likely failed silently - common with Colab's network throttling on large files. Re-run the pull command; Ollama resumes from where it left off.
gemma3:27b, llama3:70b in Q4, and most other frontier open-source models. At $10–$50/month, it's still significantly cheaper than sustained OpenAI or Anthropic API usage at any meaningful volume.
🎁 Bonus - How to Persist Ollama Models Across Colab Sessions with Google Drive
Every Colab session starts from a blank VM. When the session ends - whether you disconnect, the runtime times out, or the tab closes - everything in /root is gone. Including your Ollama models.
For a 7B model, that's 4–6 GB and 3–6 minutes of download time, every single restart. Run this setup twice a day for a week and you've wasted an hour doing nothing but waiting for model downloads.
Mounting Google Drive and redirecting Ollama's model storage path fixes this permanently. The first session pulls the model once. Every session after that, the model loads directly from Drive in seconds.
🕓 Why Models Disappear Between Sessions ?
Colab's VM filesystem is ephemeral by design. Google spins up a fresh containerized environment each time you connect - nothing carries over from previous sessions except what's stored outside the VM. Google Drive, by contrast, persists indefinitely. It's mounted as a filesystem path inside Colab, which means any directory on Drive looks and behaves like a local folder from Ollama's perspective.
The free 15 GB Google Drive tier is enough for two or three mid-size models simultaneously:
| Model | Size on Disk | Drive Space Remaining (from 15 GB) |
|---|---|---|
| gemma3:4b | ~4.7 GB | ~10.3 GB |
| gemma3:4b + mistral | ~4.7 + ~4.1 GB | ~6.2 GB |
| gemma3:4b + mistral + phi3 | ~4.7 + ~4.1 + ~2.2 GB | ~4 GB |
If Drive is running low, the :q4_0 quantized variants of each model save roughly 1–2 GB per model compared to defaults.
📁 Step 1: Mount Google Drive
In a new code cell, run:
from google.colab import drive
drive.mount('/content/drive')
Colab will open an authentication dialog asking you to sign in to your Google account and grant Drive access. This authentication persists for the browser session - you won't be prompted again unless you clear cookies or use a different browser.
After mounting, your Drive is accessible at /content/drive/MyDrive/.
↗️ Step 2: Redirect Ollama's Model Storage to Drive
Ollama respects a single environment variable - OLLAMA_MODELS - to control where models are stored. Setting it before starting the server is all that's needed:
# Create a dedicated models directory on Drive
mkdir -p /content/drive/MyDrive/ollama_models

# Point Ollama to Drive for model storage
export OLLAMA_MODELS=/content/drive/MyDrive/ollama_models

# Kill any running Ollama process and restart with the new path
pkill ollama
ollama serve &
The & at the end runs ollama serve in the background so it doesn't block the cell. Wait 3–5 seconds after running this before executing the next cell - the server needs a moment to initialize before it's ready to accept requests.
Critical order: OLLAMA_MODELS must be exported before ollama serve starts. If you set the variable after the server is already running, it won't pick it up - you'll need to pkill ollama and restart.
🛠️ Step 3: Verify the Setup
Pull a small model to confirm storage is pointing to Drive:
ollama pull phi3Then check the Drive directory:
ls /content/drive/MyDrive/ollama_models/You should see a manifests and blobs subdirectory - Ollama's internal model storage structure. If the directory is empty after pulling, the OLLAMA_MODELS variable wasn't set correctly. Run echo $OLLAMA_MODELS to confirm it's pointing to the Drive path.
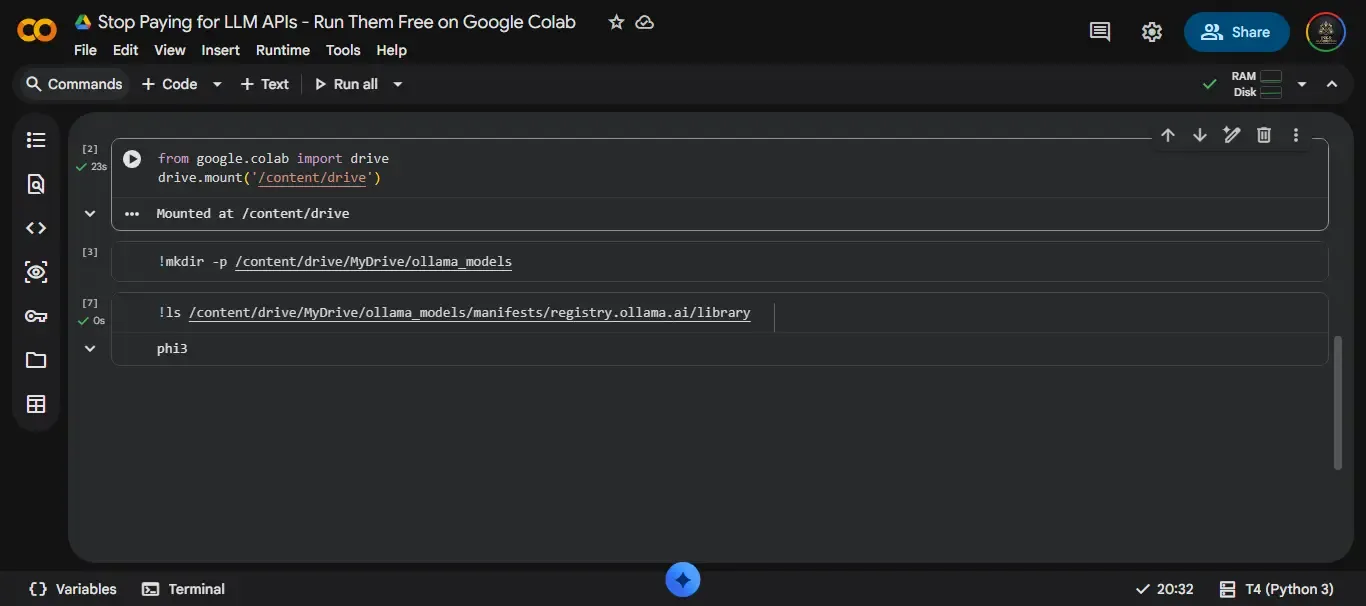
🚀 Step 4: Build Your Persistent Startup Cell
The real payoff comes from combining everything into a single startup cell that runs at the top of every session:
# Cell 1 - Run this every session start
from google.colab import drive
drive.mount('/content/drive')

import subprocess, os

os.environ["OLLAMA_MODELS"] = "/content/drive/MyDrive/ollama_models"
subprocess.Popen(["ollama", "serve"])

import time
time.sleep(5)  # Wait for server to initialize

print("Ollama server ready - models loading from Google Drive")
On the first session, run ollama pull <model> after this cell to download your model to Drive. From the second session onward, skip the pull entirely - the model is already there. The server finds it in Drive and starts serving it within seconds of startup.
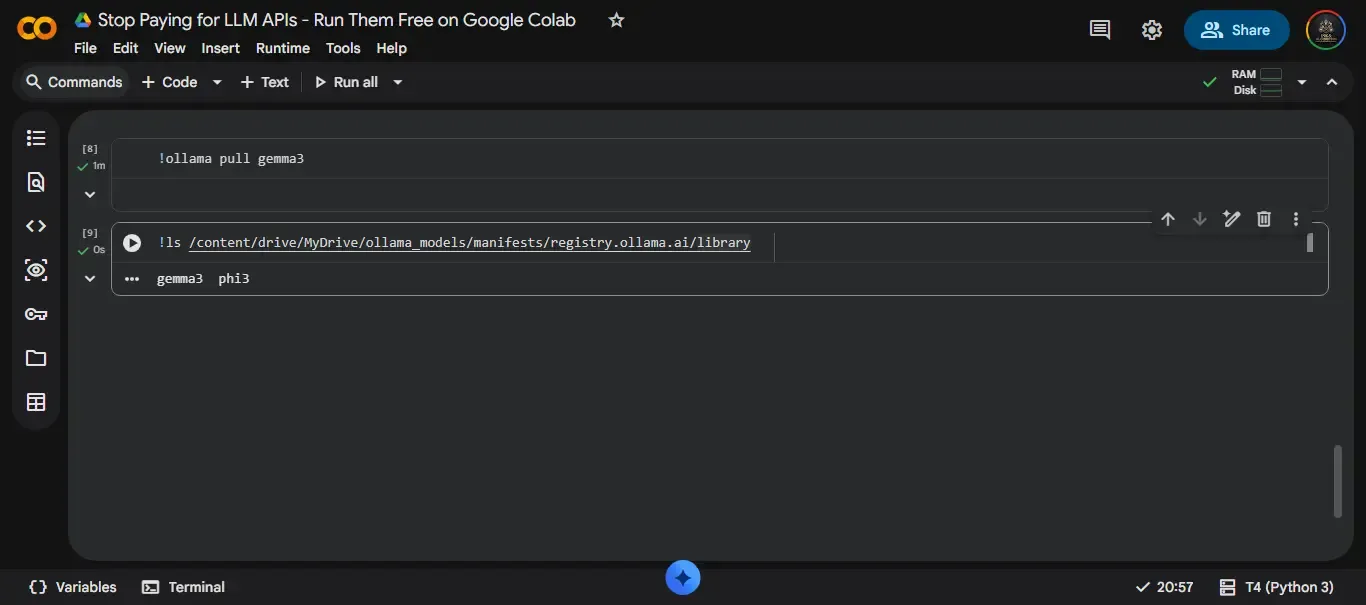
Time saved per session: 5–10 minutes, depending on model size and Colab's network speed. For a model you open and close regularly, that compounds quickly.
One edge case to know: If you rename or move the ollama_models directory on Drive outside of Colab, Ollama won't find the models and will behave as if nothing is installed. Keep the path consistent, or update OLLAMA_MODELS in your startup cell to match.
4️⃣ Step 4 - How to Test Ollama Using Three Python SDKs
This is where the setup pays off. With the Ollama server running and a model pulled, you can test it using any of three Python SDKs - and the choice of SDK determines how much of your existing code you can reuse.
The practical implication: if you've already built something against the OpenAI API, you can point it at Ollama with a one-line change. If you're working with Anthropic-based tooling - Claude Code, an anthropic SDK pipeline, or anything using the Messages API - the same applies. Ollama speaks both protocols natively.
📊 SDK Comparison at a Glance
| SDK | Install | base_url | api_key | Best For |
|---|---|---|---|---|
| Ollama SDK | pip install ollama | Auto( localhost:11434) | Not required | Native features, streaming, embeddings |
| OpenAI SDK | pip install openai | http://localhost:11434/v1/ | 'ollama' | Drop-in OpenAI replacement, LangChain, LlamaIndex |
|
Anthropic SDK |
pip install anthropic | http://localhost:11434 | 'ollama' | Claude Code, Anthropic SDK pipelines, Messages API |
One server, three clients. Pick the one that matches your existing codebase.
🧩 Option A - Native Ollama SDK
The Ollama SDK is the most direct way to interact with the server. It auto-detects localhost:11434 - no URL configuration needed.
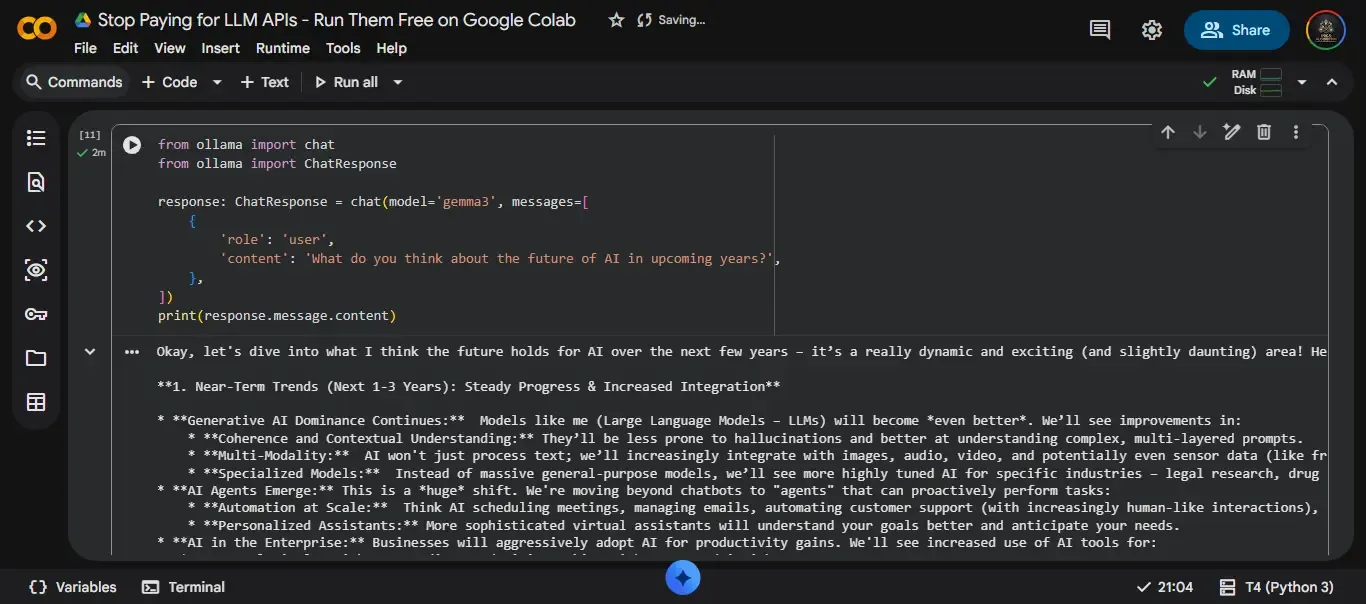
!pip install ollamafrom ollama import chat
from ollama import ChatResponse
response: ChatResponse = chat(model='gemma3', messages=[
{
'role': 'user',
'content': 'What do you think about the future of AI in upcoming years?',
},
])
print(response.message.content)
The ChatResponse object gives you direct access to .message.content for the text output, plus metadata like token counts and model name. The SDK also supports streaming responses out of the box - pass stream=True to chat() and iterate over the generator to print tokens as they arrive, rather than waiting for the full response.
Best for: Projects built specifically around Ollama, use cases that need streaming, or workflows that call Ollama-specific features like ollama.embeddings() for vector generation.
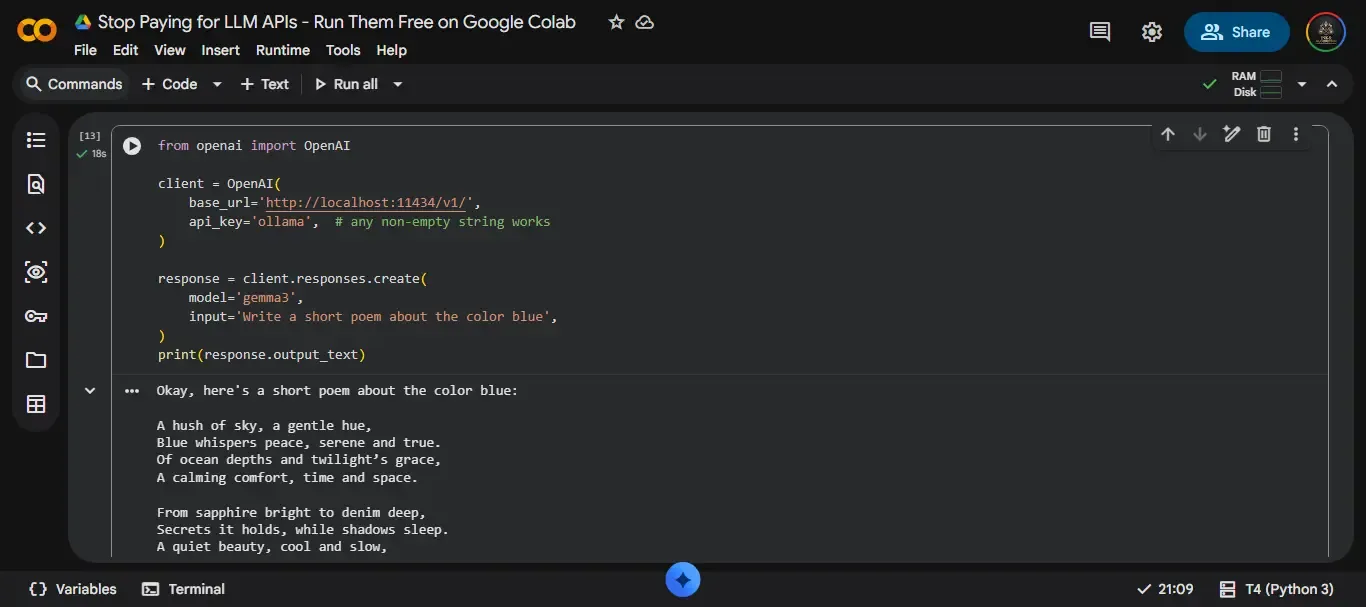
🔄 Option B - OpenAI SDK (Drop-in Replacement)
This is the most immediately useful option for most developers. If you've written code against openai.ChatCompletion or openai.responses.create, you're two lines away from running it against a free local model instead.
!pip install openaifrom openai import OpenAI
client = OpenAI(
base_url='http://localhost:11434/v1/',
api_key='ollama', # any non-empty string — Ollama ignores the key value
)
response = client.responses.create(
model='gemma3',
input='Write a short poem about the color blue',
)
print(response.output_text)
Two configuration lines swap the entire backend from OpenAI's servers to your Colab GPU. The rest of your code stays identical.
The trailing slash on base_url matters. http://localhost:11434/v1/ works. http://localhost:11434/v1 without the slash returns a 404 on most OpenAI SDK versions. It's the single most common mistake when migrating existing code to Ollama.
This compatibility extends to the entire OpenAI SDK ecosystem:
LangChain - use ChatOpenAI(base_url='http://localhost:11434/v1/', api_key='ollama')
LlamaIndex - works with any OpenAI-based LLM class
Continue (VS Code extension) - configure the Ollama provider in config.json
Any tool that accepts a custom base_url - works without modification
Best for: Migrating existing OpenAI-powered apps to local inference, integrating with LangChain or LlamaIndex, or any tool in the OpenAI SDK ecosystem.
✴️ Option C - Anthropic SDK
This is the option most tutorials skip entirely, and it's genuinely useful for a growing slice of the developer community.
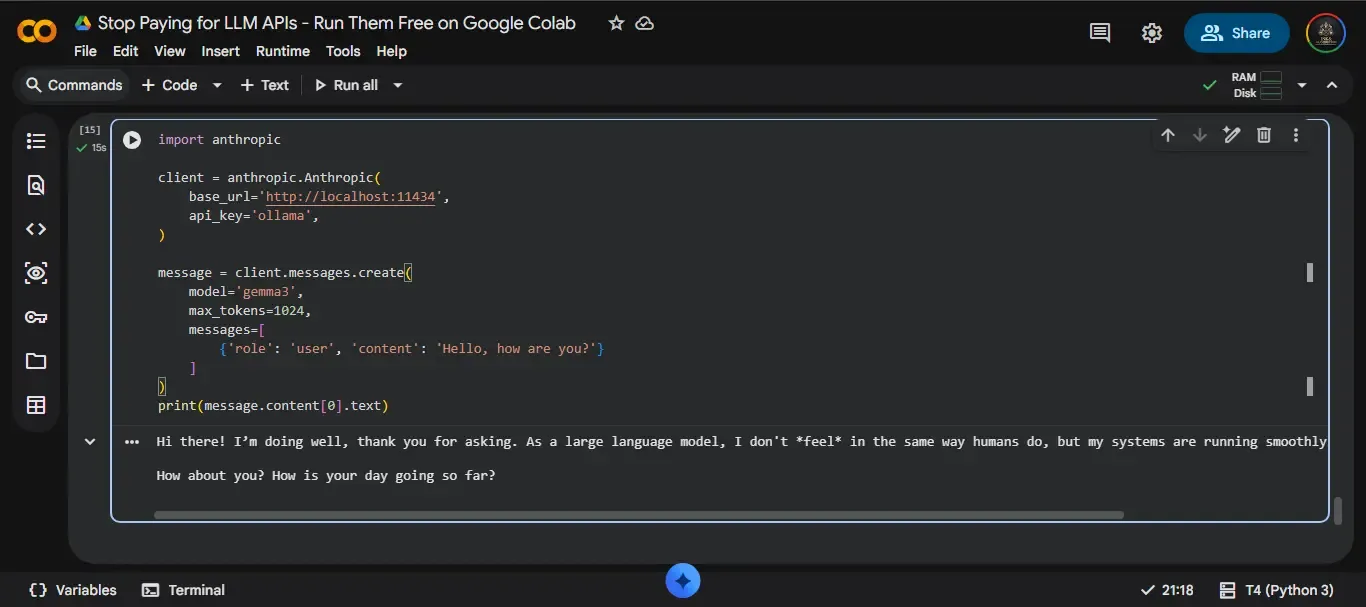
Since Ollama v0.14.0, the server natively supports the Anthropic Messages API at /v1/messages. That means the anthropic Python SDK connects to Ollama directly - no adapter, no wrapper, no middleware.
!pip install anthropicimport anthropic
client = anthropic.Anthropic(
base_url='http://localhost:11434',
api_key='ollama',
)
message = client.messages.create(
model='gemma3',
max_tokens=1024,
messages=[
{'role': 'user', 'content': 'Hello, how are you?'}
]
)
print(message.content[0].text)
Note that base_url here does not include /v1/ - the Anthropic SDK appends that path internally. Using http://localhost:11434 is correct. Using http://localhost:11434/v1/ will double the path prefix and break the connection.
The Claude Code integration. This is where the Anthropic SDK option becomes particularly powerful. Claude Code respects the ANTHROPIC_BASE_URL environment variable. Set it to your Ngrok tunnel URL (covered in the next step) and Claude Code routes all its inference requests to your Colab-hosted Ollama server - running open-source models through the exact same interface you'd use with Claude:
export ANTHROPIC_BASE_URL=https://xxxx.ngrok-free.app
export ANTHROPIC_API_KEY=ollama
From that point, Claude Code calls your Gemma3 or Llama3 model on Colab's T4 GPU instead of Anthropic's API. No API costs. No rate limits.
Best for: Developers working with Claude Code, existing anthropic SDK pipelines, or anyone building against the Anthropic Messages API who wants a free local alternative for development.
Which SDK should you use? There's no wrong answer - all three talk to the same server and the same model. If you're starting fresh, the native Ollama SDK is cleanest. If you're migrating existing code, match the SDK you're already using. The model doesn't know or care which client sent the request.
5️⃣ Step 5 - How to Expose Ollama Externally with Ngrok ?
At this point, Ollama is running and responding to requests - but only from inside the Colab notebook. Every SDK call so far has used localhost:11434. That works fine for notebook-based experiments, but the moment you want to call this server from your laptop, a VS Code extension, a mobile app, or a CI pipeline, you need a publicly reachable URL.
Ngrok punches a secure HTTPS tunnel through Colab's network isolation in under two minutes. No firewall rules to configure, no cloud networking to set up. You run two commands and get a public URL that proxies directly to your Ollama server.
📝 Create a Free Ngrok Account
If you haven't already, sign up at dashboard.ngrok.com/signup. The free tier supports one active tunnel - exactly what this setup needs.
After verifying your email, navigate to Your Authtoken in the left sidebar and copy the token. It looks like a long alphanumeric string. Keep it accessible - you'll paste it into Colab in the next step.
💻 Install Ngrok on Colab
Ngrok isn't pre-installed on Colab runtimes, but it's in an official apt repository. Run this in a code cell:
curl -sSL https://ngrok-agent.s3.amazonaws.com/ngrok.asc \
| sudo tee /etc/apt/trusted.gpg.d/ngrok.asc >/dev/null \
&& echo "deb https://ngrok-agent.s3.amazonaws.com bookworm main" \
| sudo tee /etc/apt/sources.list.d/ngrok.list \
&& sudo apt update \
&& sudo apt install ngrok
This installs the official Ngrok agent - not a community package, not a Python wrapper. The agent binary is what creates and manages the tunnel directly. Installation takes about 20–30 seconds.
🔐 Authenticate and Start the Tunnel
Replace $YOUR_AUTHTOKEN with the token you copied from the dashboard:
ngrok config add-authtoken $YOUR_AUTHTOKENThen start the tunnel:
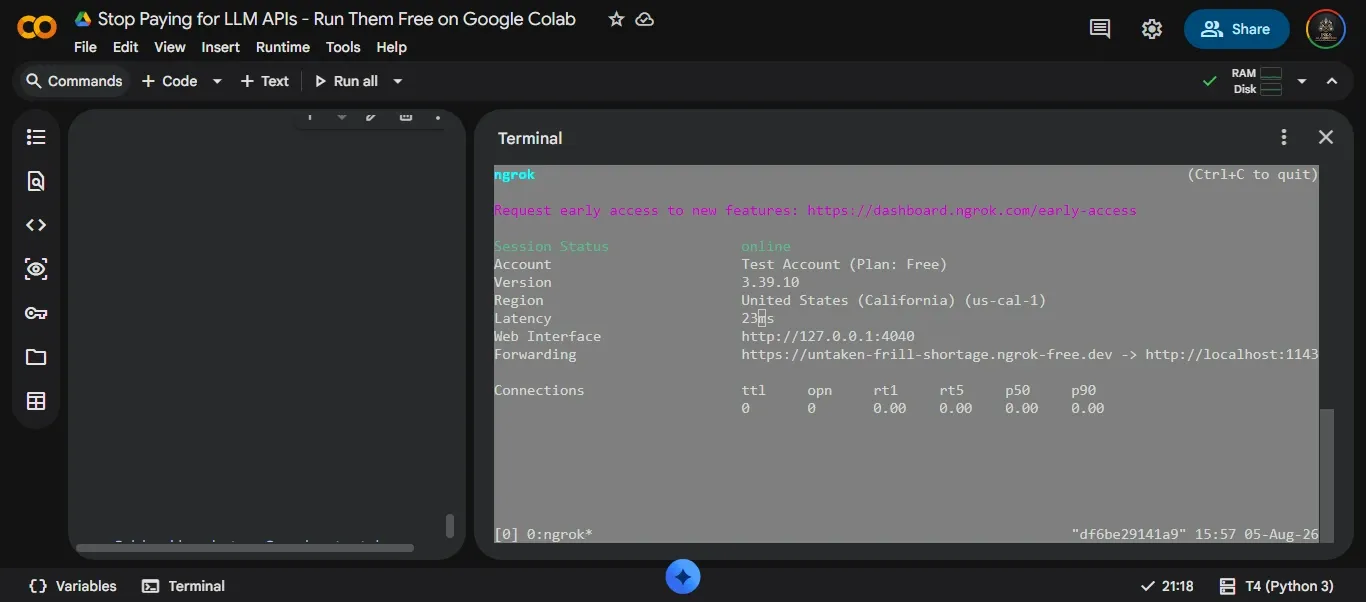
ngrok http 11434 --host-header=localhost:11434The --host-header flag is critical. Without it, Ngrok forwards requests with the public hostname in the Host header - and Ollama rejects those requests because it only accepts localhost as a valid host. This flag rewrites the header to localhost:11434 before the request hits Ollama, so the server accepts it cleanly.
You'll see output like this:
Forwarding https://a1b2c3d4.ngrok-free.app -> http://localhost:11434That public URL is your Ollama server. Copy it.
🌐 What You Can Do With the Public URL ?
With the tunnel active, your Colab-hosted Ollama server is reachable from anywhere. Swap localhost:11434 for the Ngrok URL in any of the SDK configurations from the previous step:
⚡ OpenAI SDK - call from your local machine:
from openai import OpenAI

client = OpenAI(
    base_url='https://a1b2c3d4.ngrok-free.app/v1/',
    api_key='ollama',
)
✴️ Anthropic SDK - call from your local machine:
import anthropic

client = anthropic.Anthropic(
    base_url='https://a1b2c3d4.ngrok-free.app',
    api_key='ollama',
)
✳️ Claude Code - route all inference to Colab:
export ANTHROPIC_BASE_URL=https://a1b2c3d4.ngrok-free.app
export ANTHROPIC_API_KEY=ollama
The same URL also works with LangChain's ChatOpenAI, the Continue VS Code extension, LlamaIndex, and any other tool that accepts a custom base URL. Your Colab GPU becomes a remote LLM endpoint available to your entire local development environment.
Free tier limitation: The Ngrok URL changes every time you restart the tunnel - it's not a static domain on the free plan. Anything that hardcodes the URL (a .env file, a config file, a mobile app) breaks on session restart. If URL stability matters for your workflow, Ngrok's paid plans start at around $8/month and include a fixed subdomain.
🛡️ How to Secure Your Ngrok Tunnel - Don't Skip This
This is the step most tutorials skip. They show you how to open the tunnel, then move on - leaving the endpoint completely public. Anyone who discovers or guesses your Ngrok URL can send unlimited requests to your model, burning through your Colab session time and potentially using the endpoint for abuse.
Locking it down takes under five minutes.
1️⃣ Method 1 - Basic Auth via Traffic Policy (Recommended)
Create a file called ollama.yaml in the Colab environment:
on_http_request:
  - actions:
    - type: basic-auth
      config:
        realm: ollama-access
        credentials:
          - youruser:yourpassword
        enforce: true
    - type: add-headers
      config:
        headers:
          host: localhost
Then start the tunnel with the policy attached:
ngrok http 11434 \
  --url https://$YOUR_NGROK_DOMAIN.ngrok.app \
  --traffic-policy-file ollama.yaml
Every request now requires an Authorization: Basic header with your credentials. Requests without it receive a 401 Unauthorized response before they ever reach Ollama.
To call the secured endpoint from an SDK, encode your credentials and pass the header:
import base64
from openai import OpenAI

credentials = base64.b64encode(b"youruser:yourpassword").decode()

client = OpenAI(
    base_url='https://your-domain.ngrok.app/v1/',
    api_key='ollama',
    default_headers={"Authorization": f"Basic {credentials}"}
)
2️⃣ Method 2 - IP Allowlist (Most Restrictive)
If you only ever call the endpoint from a fixed IP - your home network, your office - this is the cleanest option. In the Ngrok dashboard, go to Cloud Edge → IP Restrictions and add your IP address. All requests from any other IP return 403 Forbidden before the tunnel even forwards them.
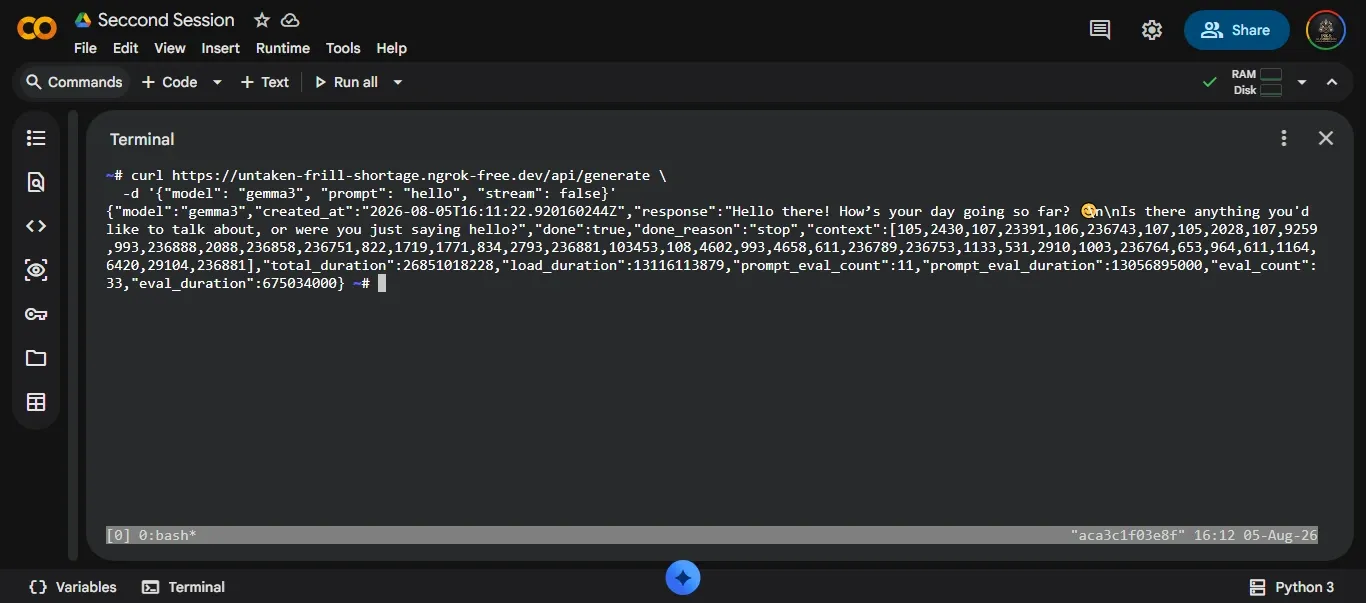
Verify auth is working:
# Should return 401 — no credentials
curl https://your-domain.ngrok.app/api/generate \
  -d '{"model": "gemma3", "prompt": "hello", "stream": false}'

# Should return a response — credentials included
curl https://your-domain.ngrok.app/api/generate \
  -H 'Authorization: Basic eW91cnVzZXI6eW91cnBhc3N3b3Jk' \
  -d '{"model": "gemma3", "prompt": "hello", "stream": false}'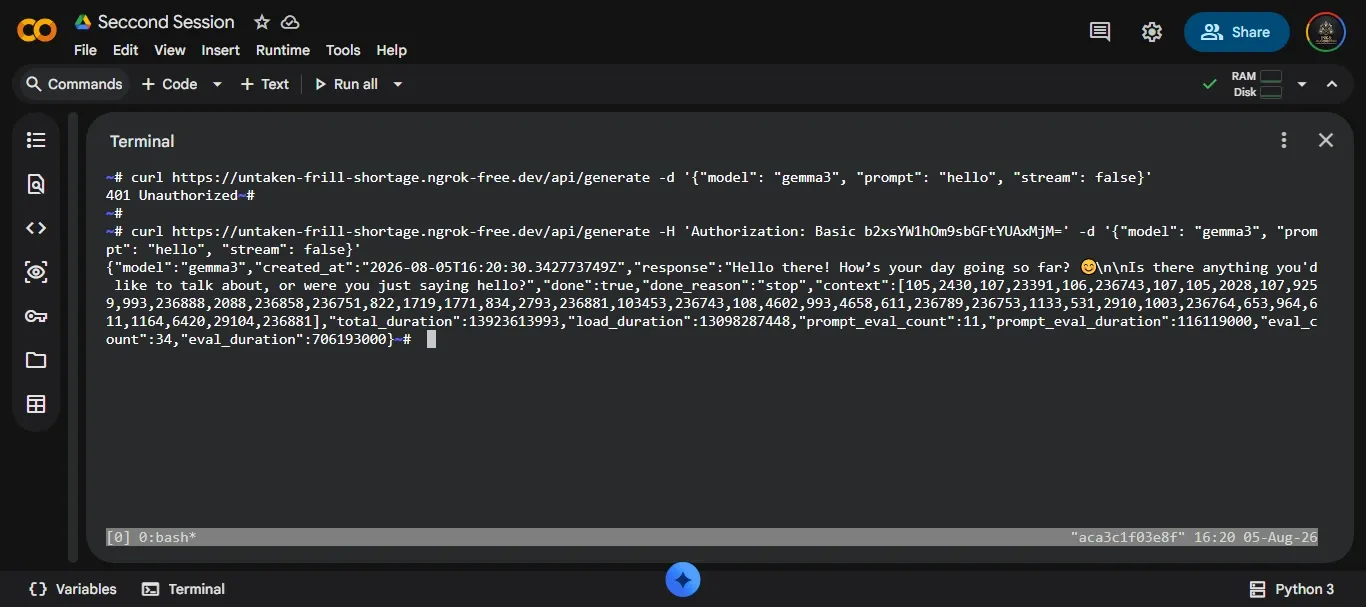
An unsecured Ngrok tunnel isn't a catastrophic risk for a short dev session, but it's an unnecessary one. The Traffic Policy YAML approach adds two minutes of setup and eliminates it entirely.
🚀⚠️ Pros and Cons of Running Ollama on Google Colab
No setup is perfect for every use case. This stack is genuinely excellent for development, prototyping, and experimentation - and genuinely wrong for production. Here's an honest breakdown.
| Pros | Cons |
|---|---|
| Free T4 GPU with 16 GB VRAM - no hardware purchase | Sessions time out after ~12 hours of active use |
| Zero CUDA configuration - GPU runtime pre-configured | Ngrok free tier generates a new URL on every restart |
| Compatible with OpenAI SDK, Anthropic SDK, LangChain out of the box | Not suitable for production - no persistent runtime guarantee |
| 100+ open-source models via ollama pull | Models must be re-pulled without Google Drive setup |
| Model persistence across sessions with Google Drive mount | Drive mount and Ollama restart required each session |
| Secure external access via Ngrok with Basic Auth | Free Ngrok = single tunnel, no static domain |
| Completely private - inference never touches a paid API | Colab idles out on inactivity; long pauses kill the session |
| Works as Claude Code backend via ANTHROPIC_BASE_URL | v5e-1 TPU runtime not compatible - T4 GPU only |
The honest verdict: If your goal is to cut API costs during development, validate a product idea before committing to paid infrastructure, or experiment with open-source models without a GPU purchase, this stack delivers everything you need. The session timeout and URL rotation are real friction - but the Google Drive persistence and startup cell from earlier in this guide reduce both to a manageable one-time-per-session overhead.
Where it breaks down is production. Real users, real traffic, uptime requirements - Colab wasn't built for any of that. When you cross that line, RunPod, Lambda Labs, or a small dedicated VPS with a GPU are the right next step. The architecture you built here transfers directly; only the hosting changes.
For development use, the tradeoff is straightforward: a few minutes of session setup in exchange for zero API costs, full model control, and a private inference endpoint that works with every major Python LLM SDK.
💡 Troubleshooting Common Issues
When something breaks in this setup, it's almost always one of seven things. Here's how to diagnose and fix each one without guesswork.
Ollama Fails to Start
Symptom: The install script runs but curl http://localhost:11434 returns Connection refused.
Fix: Run the below command. First-run failures on cold Colab runtimes are common:
nohup ollama serve > ollama.log 2>&1 &If the second run also fails, check the install output for CUDA detection errors. A line like no NVIDIA GPU detected means the runtime didn't connect to the T4 - disconnect the runtime, reconfirm T4 GPU is selected under Runtime → Change Runtime Type, and reconnect.
Port 11434 Not Active
Symptom: sudo ss -tuln doesn't show 0.0.0.0:11434.
Fix: The Ollama process isn't running. Start it manually:
ollama serve &Wait 3–5 seconds, then re-check with sudo ss -tuln. This also applies after any runtime restart - Ollama doesn't auto-start between sessions.
Model Pull Fails or Is Slow
Symptom: ollama pull hangs indefinitely, errors out, or downloads at under 1 MB/s.
Fix: Colab's network throughput varies significantly by time of day. Two approaches:
Try a smaller model first (ollama pull phi3 - 2.2 GB) to verify the pipeline works before committing to a 6 GB download
If a pull stalls partway through, re-run the same command - Ollama resumes from the last completed chunk
OOM crash during inference: If the model loads but the server crashes when you send a request, you've hit the T4's 16 GB VRAM ceiling. Check the VRAM table in Step 3 and switch to a smaller model or a :q4_0 quantized variant.
Google Drive Models Not Loading
Symptom: ollama list returns empty even though models were previously pulled to Drive.
Diagnose in order:
# 1. Check the env var is set
echo $OLLAMA_MODELS

# 2. Confirm Drive is mounted
ls /content/drive/MyDrive/

# 3. Confirm the models directory exists
ls /content/drive/MyDrive/ollama_models/
The most common cause: ollama serve was started before OLLAMA_MODELS was exported. The server caches the storage path at startup - setting the variable afterward has no effect.
Fix: pkill ollama, re-export the variable, then restart with ollama serve &.
Ngrok Tunnel Drops or Stops Forwarding
Symptom: The Ngrok URL returns a 502 Bad Gateway or stops responding.
Fix: The tunnel process was killed when Colab's idle timeout hit, or the free session limit (2-hour tunnel for unverified accounts) expired. Re-run the tunnel command to get a new URL:
ngrok http 11434 --host-header=localhost:11434For automated tunnel management without manually re-running the command, use the pyngrok Python library directly inside the notebook:
from pyngrok import ngrok
public_url = ngrok.connect(11434, host_header="localhost:11434")
print(public_url)
pyngrok keeps the tunnel alive as long as the notebook kernel is running - no separate terminal process needed.
OpenAI SDK Returns 404
Symptom: client.responses.create() or client.chat.completions.create() raises a 404 Not Found error.
Two causes, check in order:
Missing trailing slash - base_url must be http://localhost:11434/v1/ with the trailing slash. http://localhost:11434/v1 without it routes to the wrong endpoint on most OpenAI SDK versions.
Wrong model name - the model name in the API call must exactly match what Ollama has pulled. Run ollama list to see available models and copy the name character-for-character:
ollama list
# NAME            ID              SIZE
# gemma3:latest   abc123...       4.7 GB
Use gemma3 or gemma3:latest - not gemma-3 or gemma3b.
Anthropic SDK Returns Connection Refused
Symptom: client.messages.create() raises a Connection refused or APIConnectionError.
Two causes:
Ollama version too old - Anthropic Messages API support requires v0.14.0 or higher. Check:
ollama --versionIf it returns a version below 0.14.0, re-run the install script to get the latest release.
Wrong base_url format - The Anthropic SDK appends /v1/messages internally. Your base_url should be http://localhost:11434 - without any path suffix. Using http://localhost:11434/v1 doubles the path and breaks routing.
⁉️ Frequently Asked Questions
Is Google Colab free for running Ollama?
Yes - completely. Google Colab's free tier provides access to an NVIDIA T4 GPU with 16 GB of VRAM for up to 12 hours of active session time. No credit card is required, and no paid plan is needed to follow this guide. The free tier is sufficient for running all 7B and 8B parameter models covered here. The only cost is time: sessions reset after ~12 hours, so this setup is intended for development and experimentation, not persistent production use.
Which Ollama models work best on Colab's free T4 GPU?
Models in the 4B–8B parameter range hit the best performance-to-VRAM ratio on the T4's 16 GB. The most reliable options are gemma3:4b, mistral (7B), llama3:8b, qwen3:8b, and deepseek-r1:8b - all comfortably under the VRAM ceiling with headroom to spare. For smaller, faster responses, phi3 (3.8B, ~3 GB VRAM) is the most lightweight option. Models at 27B parameters and above require Colab Pro's A100 GPU (40 GB VRAM). The full VRAM compatibility table in Step 3 covers every major model with exact memory requirements and pull commands.
Can I use Ollama on Google Colab as a free OpenAI API replacement?
Yes - and it requires changing the base_url parameter while creating OpenAI Client. Everything else in your existing OpenAI-based code stays identical. This compatibility extends to LangChain (ChatOpenAI), LlamaIndex, the Continue VS Code extension, and any other tool that accepts a custom base_url. The model handles the same prompt formats and returns the same response structure - your application code doesn't need to know it changed backends.
How do I save Ollama models between Google Colab sessions?
Mount Google Drive and redirect Ollama's model storage before starting the server. On future sessions, run the same mount and export commands before ollama serve - models are already on Drive and load instantly without re-downloading. The free 15 GB Drive tier holds two to three mid-size models simultaneously.
Is it safe to expose Ollama through a Ngrok tunnel?
By default, no - Ngrok tunnels are fully public. Anyone with the URL can send requests to your model. For personal development use, add Basic Auth via a Ngrok Traffic Policy YAML file (covered in Step 5) to require credentials on every request. For stricter access control, use Ngrok's Cloud Edge IP Restriction feature to allowlist only your IP address. Either approach takes under five minutes to configure and eliminates unauthorized access entirely. Never share an unsecured Ngrok URL publicly.
Can I connect Claude Code directly to my Colab-hosted Ollama server?
Yes. Since Ollama v0.14.0, the server natively supports the Anthropic Messages API at /v1/messages - the same endpoint Claude Code uses. Once your Ngrok tunnel is running, set environment variables in your local terminal. Claude Code will route all inference requests to your Colab GPU - running whichever open-source model you've pulled (Gemma3, Llama3, Mistral, etc.) through the exact same interface as Claude. No API costs, no rate limits, no code changes in Claude Code itself.
What is the difference between Ollama and LM Studio?
Both tools run open-source LLMs locally, but they're built for different users. Ollama is CLI-first, headless, and designed to run as a background API server - which is exactly why it works on Colab without a display. It starts automatically, exposes a REST API on port 11434, and integrates directly with Python SDKs and developer tooling. LM Studio is GUI-based and built for casual exploration - it requires a desktop interface to operate, which makes it incompatible with Colab's server environment. For any developer workflow that involves code, SDKs, or remote access, Ollama is the right tool.
🎯 Conclusion
The math on this stack is straightforward. A T4 GPU, a free Ngrok account, and about 10 minutes of setup gives you a private LLM server that responds in 1–3 seconds, costs nothing per token, and works with every major Python SDK you're already using. For development and prototyping, that's a better deal than any paid API - not slightly better, materially better.
Here's what you've built:
A free GPU inference server - Ollama running on Colab's T4 GPU, handling 7B–9B open-source models within 16 GB VRAM
Persistent model storage - Google Drive mount eliminates the re-download on every session restart
Triple SDK compatibility - the same server responds to the Ollama SDK, the OpenAI SDK, and the Anthropic SDK without any additional configuration
A secure external endpoint - Ngrok tunnel with Basic Auth, accessible from your laptop, VS Code, Claude Code, or any tool that accepts a custom base_url
A production upgrade path - when the project outgrows Colab, the same architecture runs on RunPod or Lambda Labs with only the host URL changing
The one thing this setup doesn't give you is permanence. Colab sessions reset. Ngrok URLs rotate. For a validated project with real users, you'll want dedicated compute. But that's a problem you solve after you've shipped something - and this stack is exactly what lets you get there without spending money on API credits while you figure out if the idea is worth pursuing.
Open a new Colab notebook. Run the install command from Step 1. You'll have a working LLM server in under ten minutes.
Found this useful? The next guide covers connecting this Ollama server to LangChain for building multi-step AI pipelines - all running on free Colab compute. Subscribe to get notified when it's live.
gemma3:27b, llama3:70b in Q4, and most other frontier open-source models - at $10-50/month, still significantly cheaper than sustained OpenAI or Anthropic API usage at any meaningful volume.
📖 Recommended Blogs
Discover the best deals, trending products, and must-have finds.
Categories
Solutions
Smart Solutions Powered by Tools We Trust
Recommended Solutions to Simplify Your Everyday Needs
Handpicked Solutions Backed by Real Results